


Complete Guide to Installing and Maintaining MATIERA Products: Cladding, Paving, and Cobbles
Do you want to install your cladding, paving, or brick slips successfully? Are you wondering how to ensure the longevity of your creations and maintain them effectively? This guide provides practical advice and essential steps to optimize the installation and maintenance of your MATIERA products. Each product comes with a detailed technical data sheet, crucial for knowing the exact layout and ensuring a perfect installation. If in doubt, our team is available through our contact form to answer all your questions.
Cladding Installation on Mesh: Speed and Practicality
Cladding installation on mesh ensures a stable and durable fixation of your cladding materials.
For a successful installation:
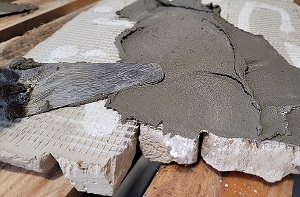
- Surface Preparation: The wall must be clean, dry, and smooth. Apply a bonding primer to ensure better adhesive adhesion.
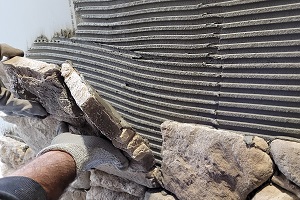
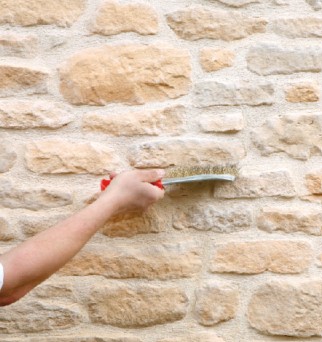
- Application of Mortar Adhesive: Apply the mortar adhesive to both the wall and the mesh using a notched trowel for even distribution.
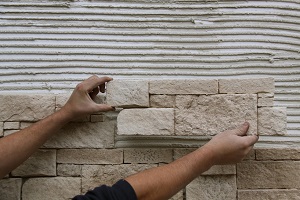
- Cladding Installation: Fix the cladding according to the layout recommended for each MATIERA cladding collection. Make sure each piece is aligned properly.
- Finishing and Verification: Check the alignment and adjust the joints if necessary for a perfect finish.
- Application of Waterproofing: For outdoor applications or in damp areas (bathrooms, kitchens), apply waterproofing to enhance the material's resistance to moisture.
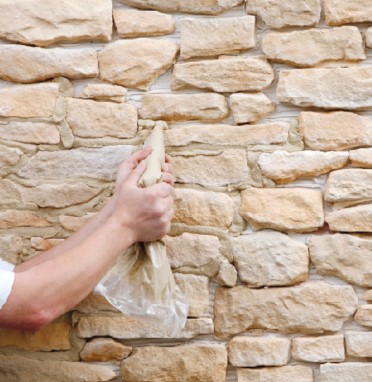
1. Apply a thin layer of adhesive to the back of the cladding.
2. Stick the cladding using double adhesive application.
3. Remove excess adhesive and then apply waterproofing.
Watch our tutorial on YouTube:
Cladding Installation with Joints: Traditional and Solid Finish
Cladding installation with joints is ideal for those seeking a traditional and durable finish.
Here are the key steps:
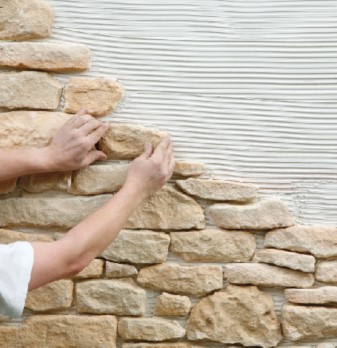
- Positioning the Cladding: Arrange the cladding while respecting the spacing for the joints. The layout must be rigorously followed for a consistent result.
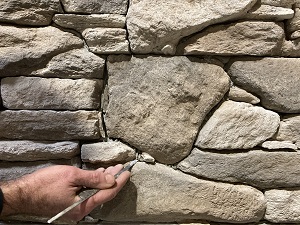
- Filling the Joints: Once the cladding is installed, fill the joints with a specific mortar suitable for natural stone.
- Smoothing the Joints: Smooth the joints with a trowel for an aesthetic and durable finish.
- Application of Waterproofing: Apply waterproofing for outdoor installations and in damp areas.
1. Place the cladding with double adhesive application leaving a joint of 1 to 2 cm between each stone.
2. Grout the cladding.
3. Once hardened, remove the excess grout, then apply the waterproofing.
Watch our tutorial on YouTube:
Jointless Installation: A Modern and Contemporary Finish
Jointless installation is ideal for achieving a uniformly contemporary effect.
Here are the steps to follow:
- Surface preparation and adhesive application: Ensure the wall is perfectly smooth and apply our ORFLEX adhesive for optimal bonding.
- Cladding Installation: Place the MATIERA cladding edge to edge to create a smooth and uniform surface, with no space for joints.
- Precision in Installation: Precision is crucial for a modern finish. Ensure each cladding piece is perfectly aligned.
- Application of Waterproofing: Apply waterproofing to protect the wall in outdoor or damp environments.
1. Apply the cladding with double adhesive application.
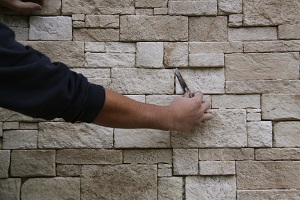
2. Remove the excess and the adhesive grooves.
3. Apply the waterproofing.
Watch our tutorial on YouTube:
Installing Brick Slips: Authenticity and Tradition at the Heart of Your Home
Installing MATIERA brick slips adds a unique charm to your interior and exterior walls.
For a perfect installation, follow these steps:
- Wall Preparation: Clean the wall thoroughly and apply a bonding primer to ensure good adhesion of the adhesive.
- Applying the Adhesive: Apply special adhesive on the wall and the brick slips.
- Placing the Slips: Place the brick slips aligning them properly. Follow the layout for a harmonious result.
- Filling the Joints: Once the slips are placed, fill the joints with specific mortar and smooth them for a clean finish.
- Final Cleaning: After drying, clean the slips to remove any excess mortar.
- Apply a waterproofing agent for outdoor and damp area applications.
Watch our tutorial on YouTube:
Paving Installation: Charm and Authenticity for Your Interior and Exterior Spaces
Noviroc paving from MATIERA is perfect for bringing authenticity and charm to your interiors, terraces, and gardens. For a successful installation:
Surface Preparation: Use a sand or mortar base to ensure a stable foundation.
Arranging the Slabs: Arrange the slabs according to the layout suited to your project.
Filling the Joints: Fill the joints to ensure the stability and aesthetics of the paving.
Finishing: Make sure the slabs are perfectly aligned and leveled for a flawless result.
Installing Cobbles: Stability and Elegance for Your Outdoor Spaces
MATIERA cobbles offer an ideal solution to set up your outdoor spaces in a durable and aesthetic way. Here’s how to proceed:
Preparing the Ground: The ground must be leveled and compacted. Use a sand base for the cobble installation.
Arranging the Cobbles: Place the cobbles according to your chosen pattern, ensuring they are aligned and stable.
Filling the Joints: Fill the joints with sand or a specific mortar to stabilize the cobbles.
Maintaining Your Cladding: Tips for Extending Its Durability
Regular maintenance ensures the beauty of your MATIERA cladding.
Here’s how to proceed:
Cleaning: Use a soft brush and clean water to remove superficial dirt.
Stain Treatment: For stubborn stains, use specific products without harsh solvents.
Applying Waterproofing: To prolong the life of your cladding, apply a waterproofing agent to strengthen its resistance to moisture.
Maintaining Your Paving: Keep Its Aesthetic Flawless
To maintain the appearance and durability of your Noviroc paving, follow these steps:
Cleaning: Use water and a brush to remove residue.
Treating Moss and Dirt: Apply specific products to remove moss or stains.
Joint Renewal: If necessary, redo the joints to maintain the stability and appearance of the paving.
Need more information?
Our team is available for any questions or requests for information. Use our contact form to get personalized assistance.